and about how long did it take?


and about how long did it take?
"Oh no, the dead have risen and they're voting Republican!"

I have built custom shelves for both my DVD and my CD collections, both of which turned out very nice. I am certainly no carpenter and my shelves lean (figuratively, not literally!) towards the "function" over "fashion".
Here's my personal technique. Build the shelves upside down. Take whatever piece will be the top and lay it on the ground. Screw in the two side pieces and prop them up with chairs or whatever you have lying around. Then, what I do is, put a row of whatever it is the shelves are for, and put two of that item sideways on top. In other words, for my CD shelves, on each end I put about 15 CDs, and then put two sideways on top of them, giving me about 3/4 inch of space. Do that on both ends, and lie the shelf on top of the CDs. Then screw the shelf into place. Your shelf will be perfectly level. Then, pull the CDs out (or game cases, whatever you're making shelves for), move them up to that shelf, and repeat the process.
Using this technique I was able to create a 4'x4' set of DVD shelves (holds approx 500 dvds) in about two hours. My CD shelves, which are 8 foot wide, took a little longer, but I still finished them in one evening. After doing these two projects, I would highly recommend painting the wood BEFORE assembly. Once finished you can nail or glue some trim to the front of your shelves for a finished look, depending on where/how you installed them. Also make sure you anchor the shelves to the wall with a few L shaped brackets.
Flack

If you're going to make custom shelves, take the time to make sure they maximize the use of your available space. Measure what you're going to store on them, and leave just enough clearance for them to fit. My floor-to-ceiling Genesis shelves fit 11 rows of boxed games, while my 2600 unit has room for 22 rows of loose carts.
I use 1" pine boards to make shelving...1x6's for most boxed games and CDs, 1x4's for loose carts. Make the sideboards first, measure and drill holes for screws, cut all shelves at the same length, and drill pilot holes to match the holes in the side boards. Screw together the top and bottom boards first to make a box, and then add the shelves in between. Get a sheet of thin backing board, cut it to match the size of your shelving unit and get some small nails to attach it. If you do it right, it will go together like a pre-made, pressboard shelving unit. Measure twice...cut once.
I ususally take my time and spend a couple of days on a unit (once the boards are cut and drilled, I recommend staining them BEFORE assembling), but I have finished them in one day when I don't have anything else to do. They are the only way to go when you need to make the most of a limited amount of space.
Good Luck,
Rich
Tomorrow's Past is Yesterday's Future Today!

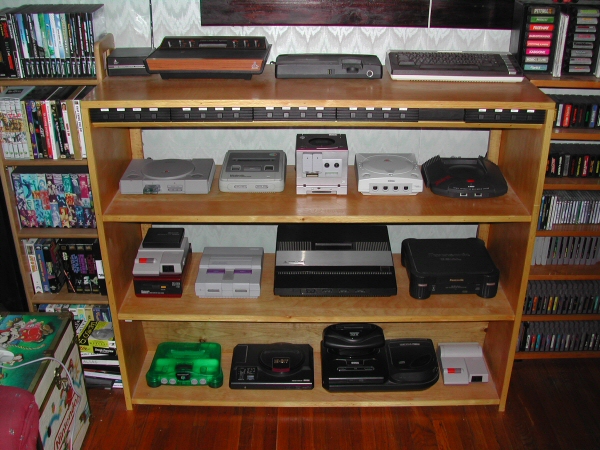
I built a custom shelf for my NES and 2600 carts, and I liked the results so much that I took the plunge and built a huge shelf for the systems, too. I designed it with all sorts of efficiency in mind. First, I wanted everything from my top-loading NES to my 5200 to fit nicely, and I wanted to have every system selectable with some sort of switching system. I also wanted to get the biggest bang for my buck when buying materials.
The first step to make all of this work smoothly was to convert all of my RF-only systems to composite or s-video and normal RCA out audio. There are lots of good tutorials out there, so I just started building video amp circuits and installing them into the systems.
Then I bought five of those black PS2-looking AV switch boxes. I used four of them to connect my systems, with four systems per switch box, 16 systems total. Then I used the fifth switch box to select between the "daughter switch boxes". Pretty simple, and I couldn't notice any degradation in quality.
Then I had to build the shelf around the switches and systems, figuring out how to get all 16 systems situated and hooked up nicely, and hopefully allow for a little expansion or swapping out when I find new or more collectible systems.
Then I stained and varnished the shelf and it looks great! I use it every day, and I get LOADS of compliments whenever anyone sees it for the first time. Check out the picture in my signature. I plan to take some measurements and post them out here since some other posters have shown interest.
Nice setup Zach. Really looks nice.
Where do the wires run? Along the back of the board, then up the boards at the rear? Where's the TV these connect to?
I need to make my own shelving soon, too bad I don't have enough room for a setup like yours.

You should see Sylentwolf's custom shelving
Fear your thoughts because they become your words
Fear your words because they become your actions
Fear your actions because they become your habits
Fear your habits because they become your character
Fear your character because it becomes your destiny
Therefore: Thinking and nurturing positive thoughts, at any point in your life, can change your destiny.

These are great pics. Thanks for the inspiration!
Chronogamer. Every game. Chronologically.
Latest entry 31 March 2010
I have forgotten to feed my fish...
Yeah, Tom61. The wires are all hidden very nicely, and they run right under the very back of each shelf over to the sides where they run vertically down both edges. You can see the little trim boards I added going up and down right inside the outer walls. There are lots of little wire-tie anchors screwed along the wire paths, and the big bundles of wires are all tied up nice and neat.
I built a shelf this weekend to house not my game collection, but my DVDs and CDs. It took about 2 hours to cut all the wood, and assemble it. I still need to paint it to match the wall, but I can do that later.

Of course!
Of course, these pics are way out of date as I've added a lot more games since then. But the shelves are the same.
I built shelving for my 700+ NES games. It took about a week, as I didn't work on it everyday, and I'm a klutz with power tools. The other posters have made some very good points... especially measure and plan ahead. There are before & after pics at my site:
http://nestral.topcities.com (scroll down to "My Nintendo Room").
I've built a TON of shelves, my best item so far is the system display shelving unit I built, you can see it at the room of doom links above, or at http://www.electricquarter.com/gameroom.htm
Rend, slaughter, devour your enemies. There is no other way to survive. You cannot escape your hunger, Warriors of Purgatory

DP Users get 8% off at www.ElectricQuarter.com using coupon code Digipress5
Nothing fancy, just function.
I used milk crates and those long closet wire shelves you can buy.
9- crates
3- 12 foot long shelves about the same depth as the crates
I routed out a groove in the crates so the shelf would sit flush, then I secured the shelf to the crate with wire ties. Placed the next row of crates on top and secured that to the crate below it.
Works great, is flexible, holds a lot, is easliy moved from room to room (just clip the ties) and has been rock-steady for years.
You can see it in the bottom of these two pictures.
http://www.digitpress.com/gameroom/fcw7.jpg
http://www.digitpress.com/gameroom/fcw8.jpg
FRED
 Posting Permissions
As an Amazon Associate I earn from qualifying purchases. Similar agreements apply to other advertising or affiliate programs such as those from eBay, Google, etc.
Copyright © 1991 - Present of Digital Press. All rights reserved.

 Reply With Quote