Page 1 of 2 12 LastLast
Results 1 to 20 of 23

Thread: Cheap thrills - fixing your own NES

  1. #1
    Great Puma (Level 12) skaar's Avatar
    Join Date
    Oct 2005
    Location
    #vbender
    Posts
    4,724
    Thanks Thanks Given 
    0
    Thanks Thanks Received 
    0
    Thanked in
    0 Posts
    Xbox LIVE
    SkaarDragoon

    Default Cheap thrills - fixing your own NES

    Alright, you've probably all done like like a bazillion times. People on here seem to go through consoles like nothing on here... I've seen LED mods, video output mods, that whole Ben Heck thing... it's all very cool.

    But tonight, *I* became a GOD.

    I bought a new 72 pin connector for my NES - in fact I bought THREE - off ebay, and installed it in my toaster deck. And it WORKS BEAUTIFULLY. AND I WILL DO IT AGAIN WITH THE OTHER TWO.

    I mean, sure I have an extra screw left and the case fit back on funny. My reset switch is askew and I can't seem to tighten anything too tight or the cartridge won't stay down. Whatever.

    I FIXED MY DAMN NES.

    And tomorrow, I'll fix it better as I take it apart to figure out where the extra screw came from.

    SO THERE.

  2. #2
    ServBot (Level 11) Custom rank graphic
    Graham Mitchell's Avatar
    Join Date
    Feb 2004
    Location
    Los Angeles, CA
    Posts
    3,623
    Thanks Thanks Given 
    0
    Thanks Thanks Received 
    1
    Thanked in
    1 Post
    Xbox LIVE
    Psygnosis8
    PSN
    Psygnosis8
    Steam
    Psygnosis8

    Default

    Oh yeah, well you suck!!! I bet you can't mod your NES to make you a martini, fill up your gas tank and give you a blowjob! Let's see you do that Mr. Smartypants.

    No, seriously, that's rad. Could you direct me to a reliable pin dealer? My good NES was crushed in a horrendous cross-country moving accident, and the only one I've got left is a blinker.

  3. #3
    Insert Coin (Level 0)
    Join Date
    Nov 2008
    Location
    Berkeley, CA
    Posts
    9
    Thanks Thanks Given 
    0
    Thanks Thanks Received 
    0
    Thanked in
    0 Posts

    Default

    Great! If you have any visual guide, it would be really appreciated! I am waiting for my new NES just bought on eBay (if the guy who sold it to me is not a fraud...he has not answered to me yet after I paid him and he has 0 feedback ) and it could be interesting to see how to do some maintenance on it!

    Thank you!

  4. #4
    Great Puma (Level 12) skaar's Avatar
    Join Date
    Oct 2005
    Location
    #vbender
    Posts
    4,724
    Thanks Thanks Given 
    0
    Thanks Thanks Received 
    0
    Thanked in
    0 Posts
    Xbox LIVE
    SkaarDragoon

    Default

    I bought these:

    http://cgi.ebay.ca/ws/eBayISAPI.dll?...m=250320808007

    They work, they seem new... I should have taken some pics as I took the thing apart I guess

    I'll do it next time or when I fix this one.

  5. #5
    Insert Coin (Level 0)
    Join Date
    Jun 2006
    Location
    Western NY
    Posts
    68
    Thanks Thanks Given 
    0
    Thanks Thanks Received 
    0
    Thanked in
    0 Posts

    Default

    I bought a bunch from here years ago, they are about twice as much now :O

    http://www.mcmelectronics.com/product/83-3785

    Edit: Here too http://www.estarland.com/product16956.html (if you don't want to buy from people on eBay)

  6. #6
    Strawberry (Level 2) NES_Rules's Avatar
    Join Date
    May 2006
    Location
    Northeast Ohio
    Posts
    511
    Thanks Thanks Given 
    0
    Thanks Thanks Received 
    0
    Thanked in
    0 Posts

    Default

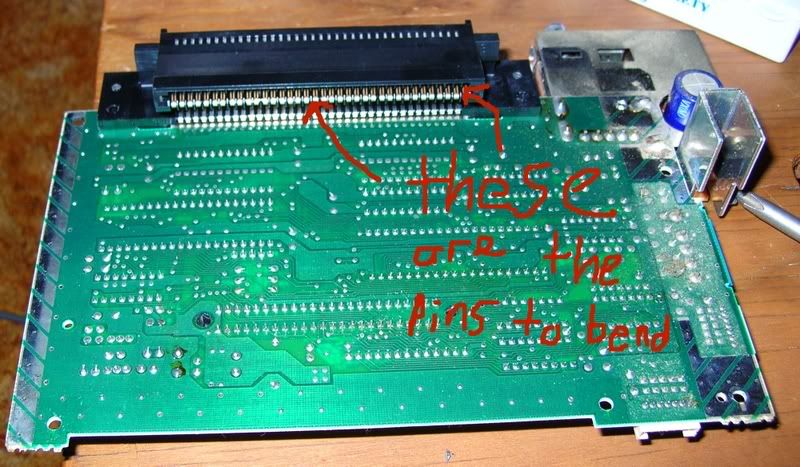
    If it's not fitting back together properly, you most likely don't have the cartridge tray lined up right on the board. It drops down and then slides onto it a little bit, kind of hard to explain, but if you look at it you'll see what I mean.

    Anyway, I've never had to replace a set of pins, I simply bend them back to where they should be. Works great and saves me precious money.

  7. #7
    Apple (Level 5) RASK1904's Avatar
    Join Date
    Oct 2008
    Location
    San Diego
    Posts
    1,199
    Thanks Thanks Given 
    0
    Thanks Thanks Received 
    0
    Thanked in
    0 Posts

    Smile

    yes the screws are very finiky. I usualy leave like 3 out. You should break the pin to the lock out chip. 4th pin from the left on the front side of the chip that says 3193A. I have done it many times and It works great. There is no more blinking but instead if it wasn't going to work it wont. You get a purple screen. People have even said they miss the blinking. I guess it's part of the pakage. This also lets you play PAL games. Which I do enjoy. Try Ufouria and crackout. Not enough info google or even youtube.
    THanx RASK1904
    In yo face!

  8. #8
    ooooOOOOHHH RUSTY!!! Custom rank graphic
    FxMercenary's Avatar
    Join Date
    Aug 2008
    Location
    Florida
    Posts
    442
    Thanks Thanks Given 
    0
    Thanks Thanks Received 
    0
    Thanked in
    0 Posts
    Xbox LIVE
    FxMercenary
    PSN
    Gronkus

    Default

    i replaced the 72 pins on both of my nintendos, it takea bout 5 minutes, just unscrew, slip off, slip on te new one, and screw it back together, no guides are needed to do this.

    Keep in mind you better take the games apart and clean the pins, or else the new connector will just get dirty again.

    Very easy to do!

  9. #9
    Kirby (Level 13) Push Upstairs's Avatar
    Join Date
    Feb 2004
    Location
    somewhere between the past and the future
    Posts
    5,464
    Thanks Thanks Given 
    0
    Thanks Thanks Received 
    0
    Thanked in
    0 Posts

    Default

    Quote Originally Posted by RASK1904 View Post
    People have even said they miss the blinking.
    Getting the blinking to go away on an old system takes some finesse, luck, and more luck.

    If you can get any blinking NES to work, *without* replacing a 72-pin connector, you can then put on your resume that you have "the touch".

    Possibility is infinity! You must be satisfied!

    You just can't handle my jawusumness responces. -The Sizz


  10. #10
    Pac-Man (Level 10) Blitzwing256's Avatar
    Join Date
    May 2005
    Location
    las vegas
    Posts
    2,038
    Thanks Thanks Given 
    0
    Thanks Thanks Received 
    0
    Thanked in
    0 Posts
    Xbox LIVE
    blitzwing256
    PSN
    blitzwing256

    Default

    or you could just cut one pin, and get rid of the blink forever more...

  11. #11
    Pac-Man (Level 10) Custom rank graphic
    XYXZYZ's Avatar
    Join Date
    Jun 2005
    Location
    1986
    Posts
    2,606
    Thanks Thanks Given 
    0
    Thanks Thanks Received 
    0
    Thanked in
    0 Posts

    Default

    Quote Originally Posted by Blitzwing256 View Post
    or you could just cut one pin, and get rid of the blink forever more...
    I still use the original connector in my NES, but I have to pull it out and bend the pins toward the center once every two or three years. Works fine.

    I need to stop leaving games in it!

  12. #12
    Luigi (Level 20) Custom rank graphic
    kainemaxwell's Avatar
    Join Date
    Jul 2002
    Location
    NJ
    Posts
    12,601
    Thanks Thanks Given 
    1
    Thanks Thanks Received 
    12
    Thanked in
    9 Posts

    Default

    I orginially got a pin connector from MCM, but it was faulty. Someone here was selling OEM connectors sometime ago so I got one off him, no blinking screen and extra screws since.
    My Gaming Collection (Now at Google Drive!)

  13. #13
    Great Puma (Level 12) skaar's Avatar
    Join Date
    Oct 2005
    Location
    #vbender
    Posts
    4,724
    Thanks Thanks Given 
    0
    Thanks Thanks Received 
    0
    Thanked in
    0 Posts
    Xbox LIVE
    SkaarDragoon

    Default

    I'd agree with the extra screws - fiddling with those helped.

    To all the "I bent the pins back" people please snap a pic of what pins you're bending.... because I seriously don't see what you're talking about.

  14. #14
    Pac-Man (Level 10) jcalder8's Avatar
    Join Date
    Jan 2006
    Location
    Edmonton AB
    Posts
    2,931
    Thanks Thanks Given 
    0
    Thanks Thanks Received 
    0
    Thanked in
    0 Posts
    Xbox LIVE
    BuckyBKatt
    PSN
    Bucky_B_Katt

    Default

    Show off.
    I tried to do this once and it doesn't work at all now so I just bought a top loader. I still have the toaster though.

  15. #15
    ServBot (Level 11) Custom rank graphic
    Cornelius's Avatar
    Join Date
    Jan 2007
    Location
    Wrong Place, Wrong Time
    Posts
    3,778
    Thanks Thanks Given 
    72
    Thanks Thanks Received 
    25
    Thanked in
    24 Posts

    Default

    bending the pins never worked all that well for me. I found cleaning the pins to be much better

  16. #16
    Strawberry (Level 2) NES_Rules's Avatar
    Join Date
    May 2006
    Location
    Northeast Ohio
    Posts
    511
    Thanks Thanks Given 
    0
    Thanks Thanks Received 
    0
    Thanked in
    0 Posts

    Default

    Quote Originally Posted by skaar View Post
    I'd agree with the extra screws - fiddling with those helped.

    To all the "I bent the pins back" people please snap a pic of what pins you're bending.... because I seriously don't see what you're talking about.

  17. #17
    Level 10 Manly Pink Custom rank graphic
    otoko's Avatar
    Join Date
    Sep 2005
    Location
    Batavia, IL
    Posts
    2,386
    Thanks Thanks Given 
    0
    Thanks Thanks Received 
    0
    Thanked in
    0 Posts
    Xbox LIVE
    Pirate OTK
    PSN
    theguywithus

    Default

    Hmm.. I dunno.. I've had four different Toaster NES's and every one of them had blinking problems.. I really don't know if my constant fiddling would bend them back into place or not, but I was able to get them all working like new.

    One of them was my Sharp NES tele, Thems a pain to open.. So I didn't.

    BTW NESTV owners, have you had blinking problems with your teles?

  18. #18
    Great Puma (Level 12) skaar's Avatar
    Join Date
    Oct 2005
    Location
    #vbender
    Posts
    4,724
    Thanks Thanks Given 
    0
    Thanks Thanks Received 
    0
    Thanked in
    0 Posts
    Xbox LIVE
    SkaarDragoon

    Default

    Maybe I should have been more clear... I wasn't really able to notice them being "bent" more than the new connectors I installed. So I couldn't tell how it would have made a difference to "bend them back" - much less what/how I'd pull them upwards without doing more harm than good.

    But I appreciate the pic anyway - that was cool of you.

  19. #19
    Strawberry (Level 2) NES_Rules's Avatar
    Join Date
    May 2006
    Location
    Northeast Ohio
    Posts
    511
    Thanks Thanks Given 
    0
    Thanks Thanks Received 
    0
    Thanked in
    0 Posts

    Default

    Quote Originally Posted by skaar View Post
    Maybe I should have been more clear... I wasn't really able to notice them being "bent" more than the new connectors I installed. So I couldn't tell how it would have made a difference to "bend them back" - much less what/how I'd pull them upwards without doing more harm than good.

    But I appreciate the pic anyway - that was cool of you.
    It's hard to notice the difference when comparing one that is new and an old one, but when you bend an old one back up, it's quite noticeable. And it doesn't take much for it to not work, it only takes one pin not touching the cartridge and the game won't play.

    And no problem about the pic, I already had it for something else.

  20. #20
    RACES MINI MOTORCYCLES Videogamerdaryll's Avatar
    Join Date
    Apr 2003
    Posts
    6,363
    Thanks Thanks Given 
    0
    Thanks Thanks Received 
    6
    Thanked in
    4 Posts
    Xbox LIVE
    TSMMR 47
    PSN
    Player 47

    Default

    Quote Originally Posted by XYXZYZ View Post
    I still use the original connector in my NES, but I have to pull it out and bend the pins toward the center once every two or three years. Works fine.

    !
    Me too..

    That's the way I sell them..
    the New 72 pin connectors for me SUCK,.Death Grip and some just don't work right no matter how good you clean the games.

    When I fix my own 72 pin the games always work perfectly..

Similar Threads

  1. So i was fixing my NES
    By Granado_jake in forum Classic Gaming
    Replies: 15
    Last Post: 07-04-2011, 09:59 PM
  2. Replies: 28
    Last Post: 05-14-2007, 12:42 AM
  3. CHEAP CHEAP CHEAP...need money badly.
    By Drexel923 in forum Buying and Selling
    Replies: 9
    Last Post: 08-27-2004, 05:51 PM
  4. Fixing a NES?
    By Shredder in forum Classic Gaming
    Replies: 4
    Last Post: 04-19-2004, 02:16 PM

Posting Permissions

  • You may not post new threads
  • You may not post replies
  • You may not post attachments
  • You may not edit your posts
  •